If you’re searching how to translate a JPG online, it usually means you do not just need to understand the text. You need a translated image you can actually share.
A menu, a screenshot, a product label, or a scanned note is only useful if the translated result stays readable and reusable, not just “understandable.”
|
TL;DR
|
Why it matters
Most tools stop at “text you can read.” But teams often need a translated image they can forward to a customer, paste into a deck, or attach to a ticket. That is why image-to-image translation is the safest fast workflow when layout and readability matter.
Short answer
Upload your JPG, choose the target language, and translate. If you need a result you can actually share, use image-to-image translation, which replaces the original text inside the image and returns a translated image in the same format.
What does it mean to “translate a JPG”?
There are two common outcomes when people say they want to translate a JPG:
- Image-to-text (OCR): extract the text from the image, translate it, and copy the translation somewhere else.
- Image-to-image: translate the image and get back a translated image where the original text is replaced in the right spots.
If the goal is quick understanding, OCR can be enough. If the goal is to share the result with a client, teammate, or customer, image-to-image translation is the workflow that usually saves you from rework.
Definition: OCR vs image-to-image translation
OCR image translation reads text from an image (image-to-text) and translates it as plain text. Image-to-image translation goes further by placing the translated text back into the image, so the output stays readable and shareable.
How to translate a JPG online in 3 steps
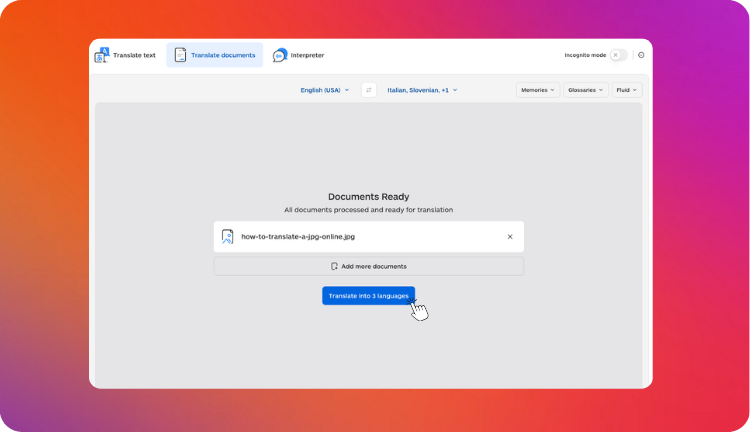
- Upload your JPG (photo, scan, screenshot, or graphic).
- Choose the target language (and keep an eye on tight UI labels where wording length matters).
- Translate and download the result. For a shareable deliverable, choose image-to-image translation, so you receive a translated image you can reuse.
How to translate a JPG online and keep the layout
If you need the translated asset to stay readable, the key is choosing an image-to-image translation workflow. That way you do not end up rebuilding the design manually in slides, Figma, or Photoshop just to place translated text back in.
- Best for: screenshots, labels, posters, banners, instructions, and any “sendable” image
- Not ideal for: cases where you only need the meaning and will never reuse the image
Supported image formats you can translate besides JPG
“Translate a JPG” is often shorthand for “translate whatever image I have.” In real workflows, that means screenshots, mobile photos, scans, and web graphics.
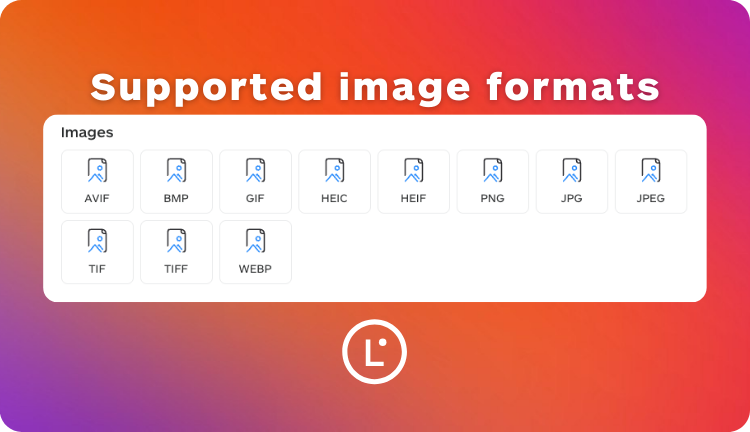
Here are 11 supported image formats commonly used in teams:
- AVIF
- BMP
- GIF
- HEIC
- HEIF
- PNG
- JPG
- JPEG
- TIF
- TIFF
- WEBP
Practically, the best workflow is the one that lets you translate the original file without converting it first. It reduces errors and avoids extra steps.
When you should use image-to-image translation
Use image-to-image translation when the image is not just an input, but also the output you need:
- Support: screenshots from users, bug reports, error dialogs, app flows
- Sales: product photos with callouts, competitor screenshots, price lists
- Ops: forms, receipts, shipping labels, instructions
- Marketing: banners, posters, flyers, social creatives
In these cases, translating into a text box is not enough. You need a translated image that stays readable and keeps the structure people recognize.
A 30-second quality check for any translated image
Before you send the translated image, do this quick check:
- Numbers and units: prices, quantities, dates, measurements
- Names: brand names, product names, people, places
- Key terms: labels, buttons, warnings, legally sensitive phrases
- Small text: footnotes, disclaimers, ingredients, model numbers
- Fit and readability: does any text look cramped, cut, or confusing?
Common problems when translating a JPG (and how to avoid them)
1) The text is blurry or too small
Fix: crop to the area that matters, zoom in, or use a higher-resolution source. If you took the photo, reshoot with better lighting and hold the camera steady.
2) The background is busy
Fix: crop tighter. If the image is a graphic, export a cleaner version. Busy textures reduce OCR accuracy and readability after replacement.
3) The image contains rotated or curved text
Fix: straighten the image first when possible. For curved text (bottles, packaging), expect a quick visual review.
4) The translation “fits” differently
Some languages expand. A short English label can become longer in Italian, German, or Portuguese.
Fix: choose simpler phrasing for tight UI labels and headings when possible. Also, favor image-to-image translation workflows that prioritize placement and readability.
Translate a JPG in a shareable way
Upload your image and get a translated version you can reuse, not just text in a box.
FAQ
Can I translate a JPG without retyping?
Yes. Most JPG translation starts with OCR image translation to extract the text, then translates it.
Can I translate a JPG online and keep the same layout?
Yes, if you use image-to-image translation, which places the translation back into the image so it stays readable and usable.
Do I need to convert my image first?
Ideally no. Translating the original format (JPG, PNG, HEIC, WEBP, TIFF) reduces friction and avoids extra mistakes.
What should I double-check on translated images?
Numbers, names, units, warnings, and any small text like disclaimers and labels.
This article is about:
- How to translate a JPG online in minutes
- When to use image-to-image translation vs OCR text extraction
- How to keep translated images readable and shareable
Useful articles:
- Image translation: how to translate images without losing meaning or layout
- How to translate images inside PDFs (scanned PDFs and embedded screenshots)

